Certainly one of the dumber things I’ve made.
Background
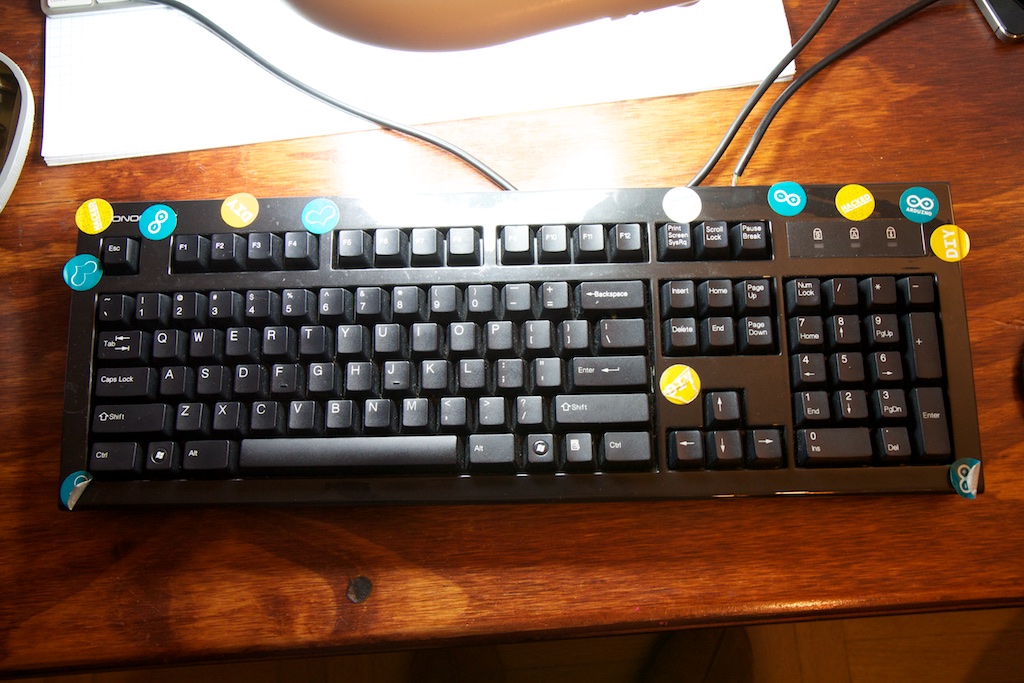
So my friend Austin from work is in Thailand for the next two weeks on vacation. There’s a tradition in my workplace of pranking people’s desks when they’re away and Austin and I in particular don’t usually even wait for the other to leave. If I leave my computer unlocked for a few minutes, I can expect the desktop wallpaper to be different when I get back, and I did this to his keyboard a few months ago:
Which is funny because the guy optimizes super low power firmware for embedded wearable devices. Not exactly an Arduino “Maker” type.
Austin is also an avid gamer and a particularly big fan of the “Montage Parody” 1337-sp34k that involves ample use of the words “SWAG” “YOLO” and “420”. I think this sort of started ironically, but the dude seriously says “swag” a lot.
I thought it’d be a fun prank to add some buttons to his keyboard to make it easier for him to type these words which he uses so much.
Keyboard
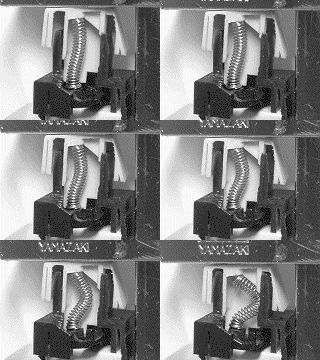
Austin’s keyboard is particularly obnoxious because it has mechanical switches. Modern “membrane switch” keyboards are made with two sheets of plastic with conductive traces that are pressed together quietly by rubber buttons that the user presses. Older keyboards such as the infamous IBM model M had mechanical contacts that usually consisted of springs that would buckle when depressed and bend sideways striking a plate and completing a circuit. I found a gif that demonstrates this:
In addition to a pleasing tactile response, these keyboards produce a very satisfying “CLACK” with every keypress which is only mildly annoying to those in the vicinity.
Though bucking spring keyboards fell out of common use due to their higher complexity and cost of assembly, some companies still offer modern versions of these keyboards including Monoprice who produced Austin’s for a reasonable $60.
The biggest advantage to this kind of keyboard when it comes to pranking is that there is a solid PCB under all of the keys instead of conductive plastic sheets. This offers tons of places to solder on new elements.
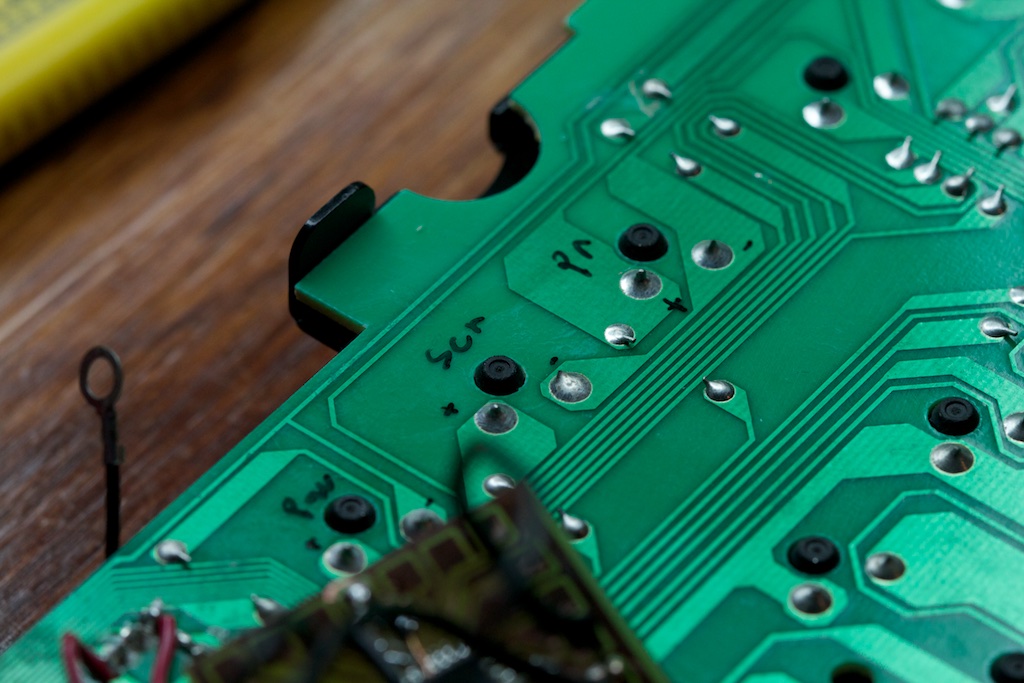
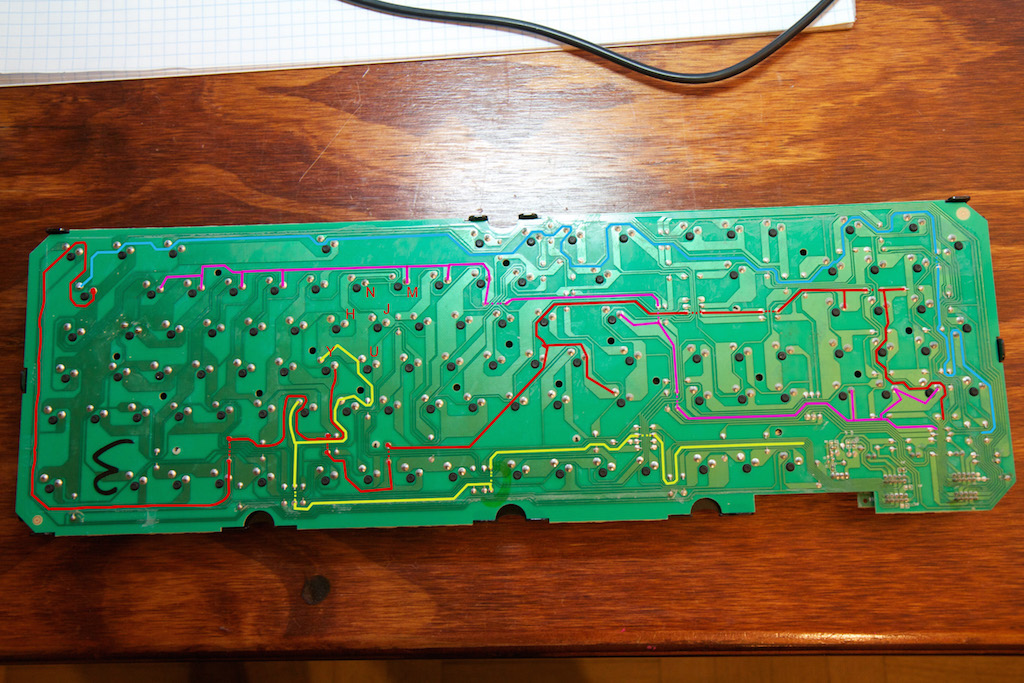
 Even better, it’s a single layer board. Anything that would have to go on the other side is simply done with small jumpers that are easy to identify from this side. That means that a high enough resolution photo is basically a complete schematic.
The Hack
So this should have been a pretty painless procedure. All I needed to do was add a small micro controller that could “press” the keys under software control.
The first step was to pick some keys that I could use to become the YOLO, swag, and 420 keys. A proper 104 key keyboard will still have Scroll Lock, Print Screen, and Pause|Break keys even though 99% of the population has no use for these (maybe Print Screen, but I’ve seriously never used the other two).
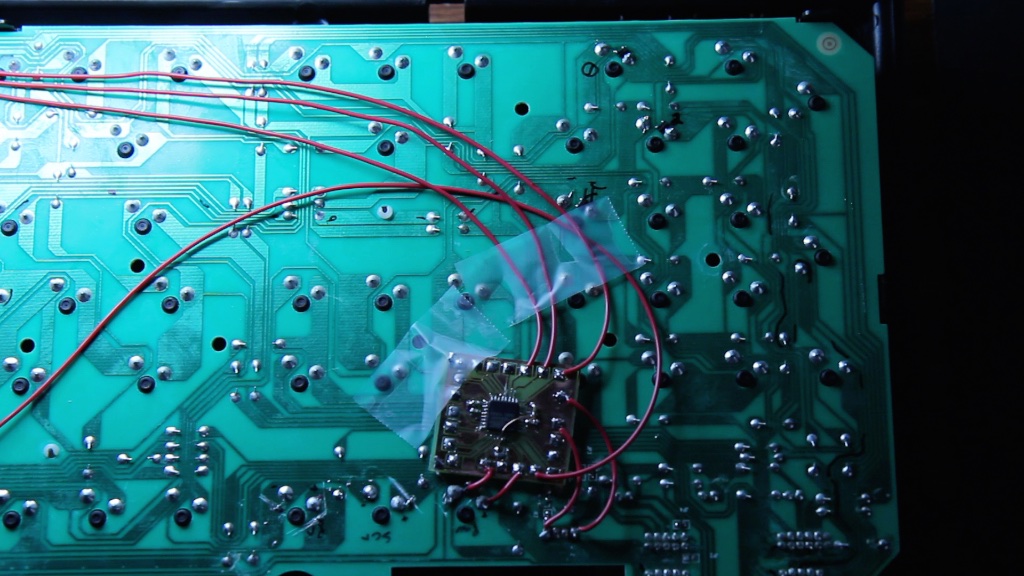
I isolated these three buttons from the keyboard by cutting the traces going to them. I then connected one of each of their contacts to a GPIO pin and the other to GND. With internal pull-ups, the GPIOs could detect when they were pressed and react appropriately.
On the off chance that Austin would ever need these keys, I hooked up their original connections to my micro controller in a way that would let me virtually “push” these three keys under software control. A toggle switch could allow the keyboard to be put back into normal mode where my firmware could simply pass the key input to the output.
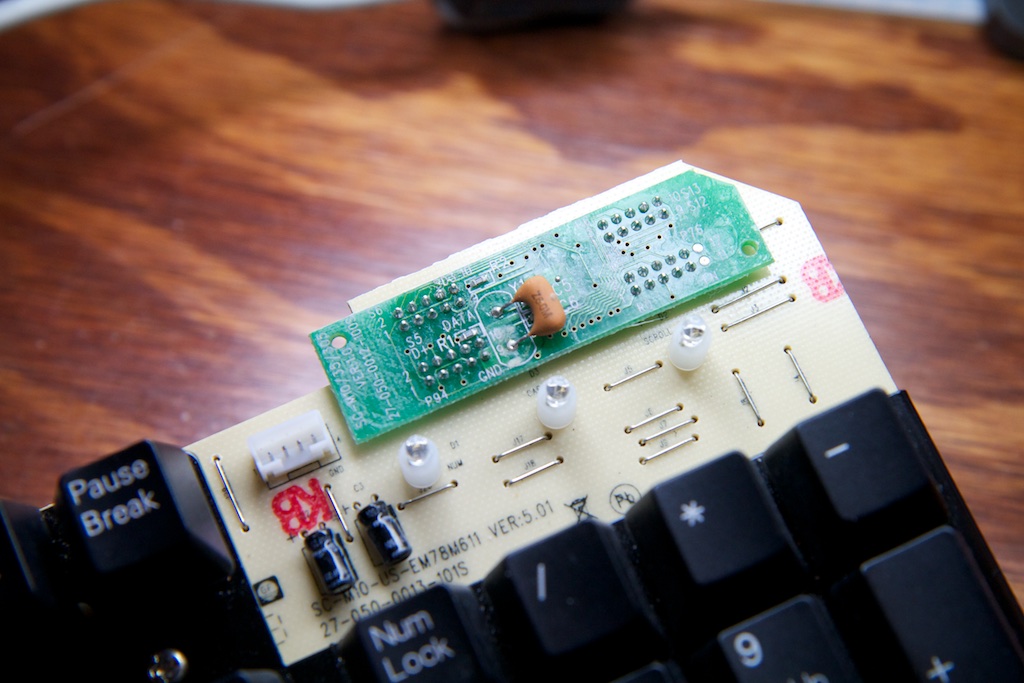
Given that this is a Monoprice keyboard (read: cheap), the enclosure is likely used for multiple different models as evidenced by the unused USB and audio ports in the back:
My original plan was to pop out one of those USB connections and drop a slide switch in there. Unfortunately, there isn’t enough space behind it to fit much of anything, so I didn’t bother. I figured that if he really needed those keys I could just undo the hack or buy him a new keyboard.
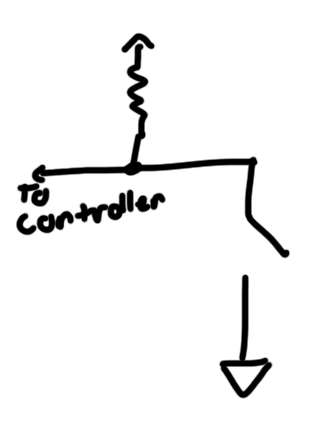
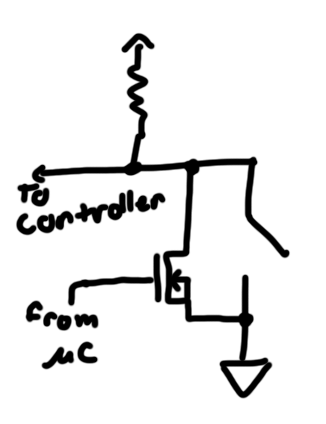
Modifying the keys to enable the virtual “push” was pretty simple. A quick probe with a multimeter showed that each key had a 3.3V and 0V pin. Presumably, some internal pull-up on the 3.3V pin would get pulled down to ground when the pin was depressed.
All I had to do was connect an NFET in parallel with the key switch and control the gate in software running on my micro controller.
Of course, it’s a little more complicated than this. Since there are 104 keys on the keyboard, this would require a keyboard controller with 104 inputs which isn’t the case here:
As you can see, this is the familiar chip-on-board epoxy blob construction that’s often used in super cheap electronics, and there are only maybe 40 pins including power, ground, and the USB D+/D- pins.
This configuration is made possible by the use of multiplexing, but more on that later.
With this in mind, I quickly hooked up the requisite keys: S, W, A, G, Y, O, L, 4, 2, 0, Print Screen, Pause|Break, and Scroll Lock. I opted to use the num pad keys for the 420 so that they wouldn’t be modified by pushing shift (as I figured he’d be using shift for SWAG and YOLO as well).
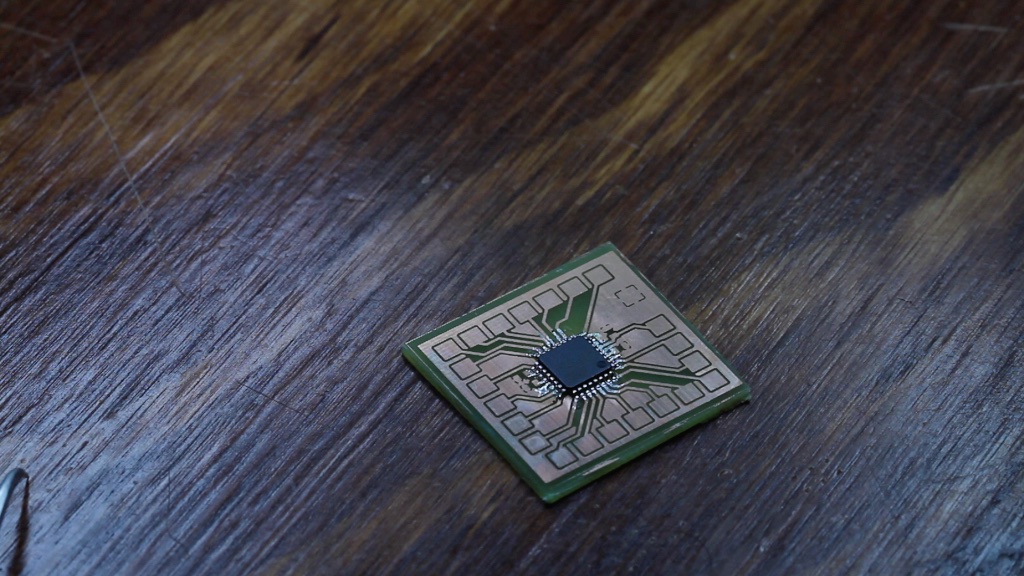
I did the schematic and layout for a simple breakout board for the ATMEGA48 in about 15 minutes. All it had to do is bring the processor pins out to pads that I could solder to.
In my haste, I actually managed to forget the pull-up resistor on the reset line, but that was easy to do in reworks #YOLO. To keep things even simpler, I just soldered the programming lines directly to the PCB. I didn’t anticipate needing to spin on the firmware too much, and once I was happy with it, desoldering these pads would be easy. Power was provided directly from the 5V USB connection.
It took me a few tries to get the firmware right. Due to the way it’s multiplexed, there’s a limit to how briefly you can press a key and still get a registered hit. I wanted to type “SWAG” as fast as possible, but if I went too fast, I would end up with “SG”. I’m not even sure what number I used (I didn’t even have the timer configured correctly on this processor, so whatever the firmware says is a “millisecond” isn’t correct). Regardless, it didn’t take long until I had a YOLO, SWAG, and 420 key. I even added repeat functionality that would type these words indefinitely until the key was released.
Problems
While the three new keys were working great, there was something weird about the rest of the keyboard. When trying to type my first name, I noticed that I couldn’t type a capital M. Actually, that’s not right, M worked with Caps Lock. In fact, M even worked while pressing the right shift key, but not the Left Shift key. I also couldn’t capitalize N, H, J, or U with the Left Shift key either. Weird.
So remember how I said that the keys are multiplexed? This means that many keys might share the same high-side or same low-side connection, and by scanning through these connections, the keyboard controller is able to determine exactly which key is being hit.
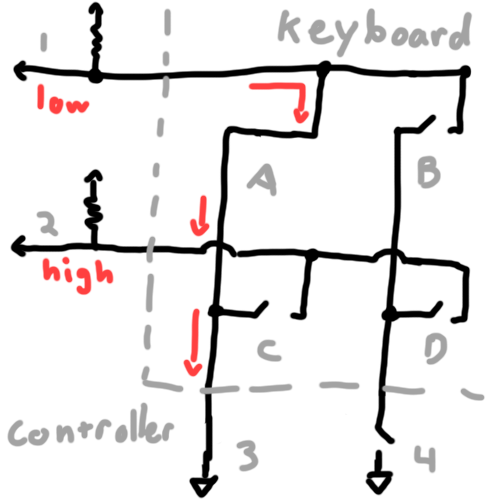
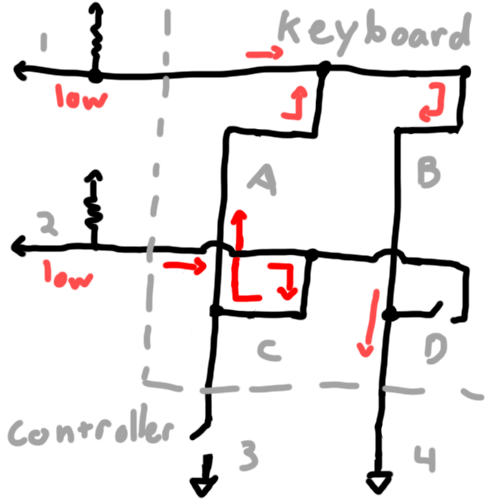
A simple keyboard with four keys, A, B, C, and D, might look something like this:
The controller has the familiar pull-up resistors we already discussed on each row (1&2), but by exerting software control over the low side of each column with FETS (here represented as switches 3 and 4), the keyboard can put multiple keys on the same pull-up resistor. This might not make sense for just 4 keys, but in a similar configuration, you can read up to 100 keys with just 20 processor pins.
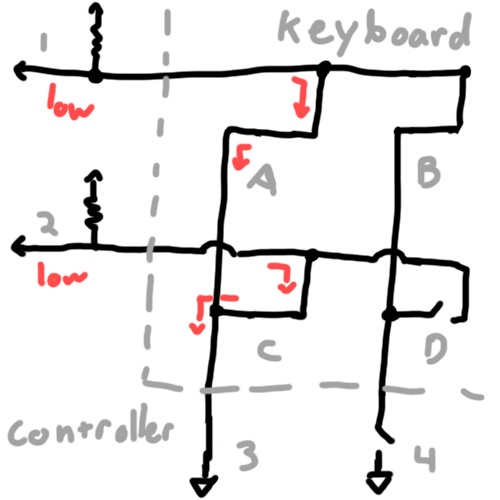
Consider the case where the A switch is closed (key is pressed). The processor will start by closing 3 which will pull that column down to ground:
Because the A key is pressed, the 1 line will be pulled down. The A key is the only key at the intersection of row 1 and column 3, so the controller knows that the A key has been pressed. It can then go on to open 3 and pull 4 low to measure B and D independently from A and C.
Looking a little closer at the keyboard, I noticed that these five forever lowercase keys all shared the same low-side connection.
They also share this connection with Y which is one of the keys that I had modified to make YOLO. Sure enough, removing my small FET returned everything back to normal. I originally shrugged it off as just something weird about that particular rail (maybe it’s just super sensitive to additional capacitance for some reason?). Since the Y had something weird about it and wasn’t going to work, I removed O and L as well. Just 420 and SWAG would be weird, so I ditched 420 as well leaving just the SWAG key. I figured that if I couldn’t toggle the mode on or off, I might as well just have the one key since there is like zero chance Austin would need the Pause|Break key. Maybe he could use the other two.
With the SWAG key all buttoned up, I thought I was in the clear until I tried to use the keyboard to play some CounterStrike. For some reason, I couldn’t press W (walk forward) and D (strafe right) at the same time. The behavior was exactly the same as M and Left Shift. Both keys would get recognized independently, but if I held one and pressed the other, it wouldn’t register the second until I released the first.
It was pretty unlikely in my mind that two different rails would have the same odd property as the Y key, and I wasn’t about to give up on this prank all together. This needed some further investigation.
My first step was to make sure that the FETs weren’t getting turned inadvertently. Maybe something was up with the ground rail of my micro controller that was causing it to float and pull-up on their gates? I disconnected the FETs from my controller and connected their gates to their sources which would guarantee that
![]()
was always under
![]()
and that the FETs were always off. This didn’t fix anything.
Even if the FETs weren’t turned on, they still were having some kind of effect on the keyboard’s performance. This is strange since a FET is pretty much an electronic switch and the mechanical switches were obviously working fine before I started messing with them. Well, they’re not quite the same.
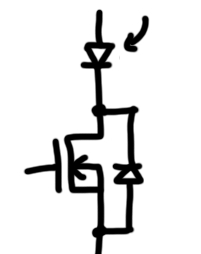
Due to the way it’s constructed, a MOSFET has an internal “body diode” that will conduct current from source to drain.
I’ve dealt with body diodes before when I was working on my EL power supply.
Still not quite understanding what the body diode could be doing to mess with the keyboard, I added a diode to the drain of each FET that would prevent the body diode from conducting any current.
And sure enough, the problem went away. I was able to hit W and D at the same time. Furthermore, reconnecting the gates to my micro controller didn’t bring the problem back, so it worked!
I happily buttoned the keyboard back together and got it ready for a return to Austin’s desk, but I still didn’t quite understand what exactly went wrong and decided to look into it further.
Ghosting and Blocking
I got the idea to use the diode fix from something I remembered when I used to work at a company that made electronic music controllers. There was something special about multiplexed key switch arrays that would sometimes require diodes to be placed on each key. I couldn’t quite remember where or why though. This took a little more googling.
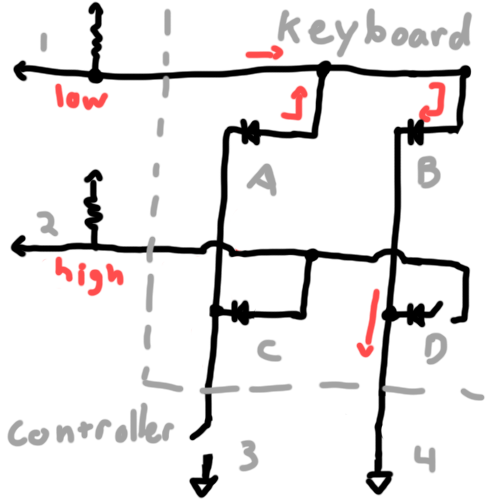
There is a problem with multiplexing keyboards that can be solved in a number of ways. The issue happens when three keys are pressed. Let’s consider our case from before except let’s press the B and C keys as well as A:
When FET 3 is closed, A and B pull down on 1 and 2, so the controller reads them as low and knows that the A and B keys are pressed. Now let’s see what happens when the controller releases FET 3 and closes 4 instead:
Because the A and C keys are still pressed, current will conduct from 2 through C, A, and B, and get sunk by FET 4 completely bypassing the D switch. From the controller’s point of view, this is identical to pushing D, so if A, B, and C are pressed, the controller will think D is pressed as well.
This is called “ghosting” and there are a number of ways to solve it.
The simplest is to just add a diode to every switch.
This prevents current from flowing backwards through switch C and makes it so that the controller correctly sees only pull-up 1 pulled low when 4 is closed.
This solution can be pretty expensive though and is a little overkill for some applications. This is what I was talking about before with music controllers. You can expect a musician playing an electronic keyboard to need the ability to press virtually any combination of keys at the same time without any strange artifacts. Computer keyboards are different though.
With the exception of the modifier keys (Ctrl, Alt, etc), you only really expect a computer keyboard to have one key pressed at a time, maybe two. Adding a diode for every one of the 104 keys is expensive and also difficult to do on membrane keyboards where there’s nowhere to solder. Some keyboards still do this and call the feature “N-key rollover” meaning that you can press any number of keys without problems, but it’s pretty expensive to implement and considered a luxury feature. Even my fancy Apple keyboard doesn’t support N-key rollover.
There is another solution to ghosting that doesn’t require any special hardware and is fairly easy to implement. When a keyboard detects that it has two keys pressed on the same column, it can choose to ignore any additional pressed keys because it knows that there is risk that another key will cause ghosting. This is called “blocking” or sometimes “jamming”. There are particular combinations of keys on a keyboard that will do this. Just playing around with my Apple keyboard, if I press asdfg, I cannot press h until I release one of the other keys. There are probably other combinations that don’t require as many keys to start blocking, but given how randomly the electrical connections are routed, it’s unlikely that you’d find such a combo on the same row of physical keys or even on the same part of the keyboard.
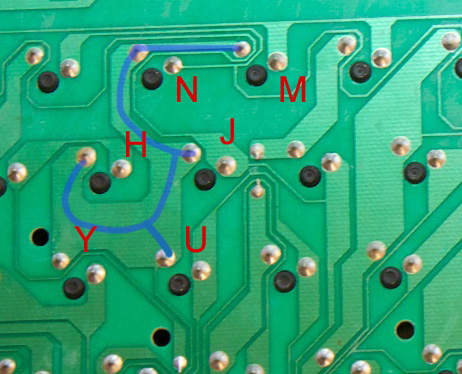
Looking back at my capital M problem, this explanation makes a lot of sense. Through some careful doodling, I was able to determine that Left Shift and Y share the same high-side connection and that M and Left Shift had no common connections.
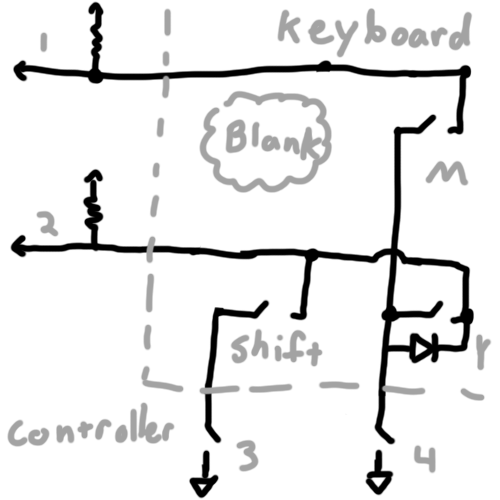
A simplified drawing of these three keys might look like this:
Where the diode on Y represents the body diode of the FET I had placed there at the time, and “Blank” shows that there is no key where line 1 and 3 intersect.
Let’s see what happens when Shift and M are pressed. The controller starts by pulling down on 3:
Although Y is not pressed, its body diode will still conduct current and pull current through the M key and to ground. This pulls down on pulll-up 1 and is a classic example of ghosting save for the fact that there just isn’t a key on this particular keyboard represented by the intersection of 1 and 3. If there were a key there, I would have seen it pressed every time I held shift and pressed M.
My guess is that the portion of the keyboard controller responsible for blocking either doesn’t know or doesn’t care that there isn’t a key there and choses to block any additional keys from being pressed anyway. But how can this be if M is already pressed? Why does this non-existant Blank key get precedence over a real one?
That just falls out of the order in which the keyboard scans the keys. This order is often optimized for the way the keys are used. You’ve probably never really detected it, but when it’s done poorly, it can be infuriating.
For example, the second version of the famous Das Keyboard had an issue where the scanning went too slow, so two keys pressed nearly simultaneously would be scanned and detected left-to-right regardless of which was actually pressed first. This was particularly annoying for words like “The” as the H and E are typed with different fingers on different hands so the keys can be pressed in very rapid succession and more importantly, they are typed from right-to-left. You can read about that here.
I tested this theory by trying to type a capital M with the Y key held. This would replace the body diode from before with a mechanical connection. Sure enough, the keyboard ignores the M as long as I’m holding Y and Left Shift.
Conclusion
So that’s all there is to it! I was expecting this to be a super quick and dirty hack, but it turned into an awesome review of how keyboard scanning works.
Austin doesn’t get back for another week, but I’m sure he’ll get a lot of use out of his new key.








Pingback: 1337-sp34k Keyboard | Hackaday
Pingback: 1337-sp34k Keyboard - zeax blog (ze-ax.com)
Pingback: 1337-sp34k Keyboard | Hack The Planet
Pingback: 1337-sp34k Keyboard | 0-HACK
As a mechanical keyboard enthusiast, this pains me. Why not just remap the key on your coworker’s computer? Or put a covert USB pass-through, like a hardware keylogger, which would catch Pause/Break and replace it with Shift+swag?
This was a prank for a friend, and I didn’t have access to his computer for remapping anything. Also, since this is a hardware blog, I tend to use hardware solutions.
I only had a week, so writing a USB keyboard button scanning driver for a device with no schematic was a little too complicated.
8mj5y6
jm8nik
bw1jbq
rk61d8
hgkks2