Hi, I’m hoping you’d be able to help me on a project I’m doing?
For a concert I’m attending, I really want to have a leather jacket that has LED lights going down both arms, and the spine. I’ve got absolutely no knowledge in wiring or anything to do with circuits, but if simple enough, I can learn.
I’ve found the LED light strips on EBay, the only problem with them, they’re not run by battery. If there is absolutely anyway you could explain how to make the lights battery powered, that a person with minimal knowledge could understand, I would be so greatful!
I would buy something similar to this: <link>
And put it down a jacket like this:
Cheers
Hi there,
Before I can help you, I have a few questions. Do you want the jacket to react to sound? Or would you just like it to light up? What color(s) would you like to see it light up?
Regards,
~ch00f
Thanks a lot for replying!
Originally, I just intended the jacket to light up and flash. But if making it light up to sound is achievable and not too hard, I’d probably do that! I was going to use just white light. Are the LED strips not able to light up to more than one color
Alright,
Those LED strips look very similar to the ones I used. Getting the LEDs to react to sound is very difficult as is making them flash if you try to control them yourself. It’s likely that your kit is like mine and will have a built in controller that will have a few settings like blinking and fading between colors. I recommend using this controller. This controller is powered by a 12V DC adapter. All you need to do to make it battery powered is to replace the 12V adapter with your own 12V source. I recommend using some 18650 battery cells as they’re fairly easy to work with (they’re the same ones I used).
Here are the batteries (and charger) I used:
2 batteries and charger:
Another 2 cells:
And a battery holder to keep them all in line:
You’ll need three cells in series to give you around 12V. If you wire it up so that all three batteries are in series and connect to the controller box of your jacket, with the correct polarity, it should work just fine. If you read through my blog post, I have a few comments on the batteries that might help you out.
Regards,
~ch00f
That sounds complicated, but achievable! 🙂
So it’s really as easy as lining up 3 batteries and connecting them to the right places? The lights look as though they come with a remote, which controls colour and effects.
And the strip is cuttable, right? So I just use the two basic wires to keep the current flowing through?
With the actual strip it’s self. I couldn’t tell by any of the details on Ebay, but you plug that into a wall? Is that cord detachable, or do I cut it? Since it will be used on my jacket.
Thanks for all the help, I’m sorry if the questions are unreasonable or stupid, I have an idea, but not a lot of knowledge behind it.
Take a look at my comments below in blue.
~ch00f
That sounds complicated, but achievable! 🙂
So it’s really as easy as lining up 3 batteries and connecting them to the right places? The lights look as though they come with a remote, which controls colour and effects.
It isn’t that difficult, but I do recommend soldering the connections as there really is no other way to make secure connections with these kinds of parts. The remote control interfaces with a controller box. The controller box sits between the LED strip itself and the 12VDC adapater. You will be replacing the DC adapter, so you will need the controller box still.
And the strip is cuttable, right? So I just use the two basic wires to keep the current flowing through?
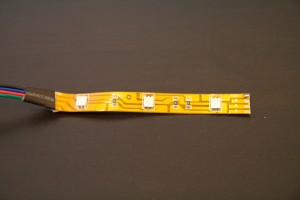
The strip is cuttable along special points that should be marked with white lines on the strip. This image
shows an example of a single section of LEDs. Here’s a close up of the end
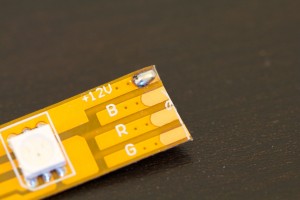
where you can see the white line and the little scissor marking showing you where to cut (it’s really that straight forward).
You will probably need to cut the strip in multiple locations in order to place it where you like around the jacket. This will require you to find a way to connect to these four conductors (not two) in multiple strips and tie them together appropriately (R to R, G to G, etc). You can solder directly to the LED strip, but it might be easier to buy a few connector clips <link> and cut and splice the wires together instead of worrying about the strip itself.
With the actual strip it’s self. I couldn’t tell by any of the details on Ebay, but you plug that into a wall? Is that cord detachable, or do I cut it? Since it will be used on my jacket.
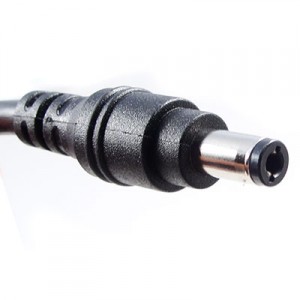
The connections go [strip]->[controller box]->[DC adapter]->[Wall socket]. Your goal is to replace the DC adapter so that you go [strip]->[controller box]->[Battery pack]. The end of the DC adapter will look something like this
This is where you have just two wires that will connect to your battery pack. It’s probably best that you cut the wires right after the plug and solder the plug end to your battery pack. The DC adapter usually puts out 12V and now your battery pack will be putting out the 12V.
Do keep in mind that you have to check polarity. It’s probably a good idea to get a voltmeter to see what the polarity (+ and -) of the original DC adapter is so that you can align your batteries in the same way.
Thanks for all the help, I’m sorry if the questions are unreasonable or stupid, I have an idea, but not a lot of knowledge behind it.
Not at all! Motivating people like you is why I write this blog in the first place. This is a fantastic learning opportunity for you. I recommend getting a soldering iron and learning to solder. It isn’t that difficult to do, the tools are cheap ($15 at Radio Shack), and it’s an incredibly useful skill to have. There are a ton of tutorials online that should help you out.
I’m hoping that once you get this all figured out, you’ll want to go on to try something even cooler. You’ll be hooked 😉


