To go along with my Kanye glasses, I made a light up jacket!

So, for those of you who haven’t noticed, my Stronger Glasses absolutely exploded over the internet. The video has over 100,000 views! One of these viewers was a DJ based in New York City who needed help on a project. He had purchased a leather jacket from Zara:

(Not exactly my style…) and a strip of color changing LEDs from Amazon:

and was planning on incorporating them together somehow. His vision was to attach the LEDs to the jacket and have them facing inwards so it looked like he was “erupting” out of the jacket. After he saw my glasses, he contacted me and asked if I could somehow get the effect he was looking for and make it sound reactive.
I accepted his challenge (and his money) and set to work designing. He mailed me the jacket and LEDs, and I had about a week to design, build, and ship the final product to him in time for his next show.
LEDs
The LED strand was actually pretty interesting. I’ve never dealt with something quite like this before. The strand consists of what looks like copper ribbon with a kapton tape insulator over it making a flexible circuit board:
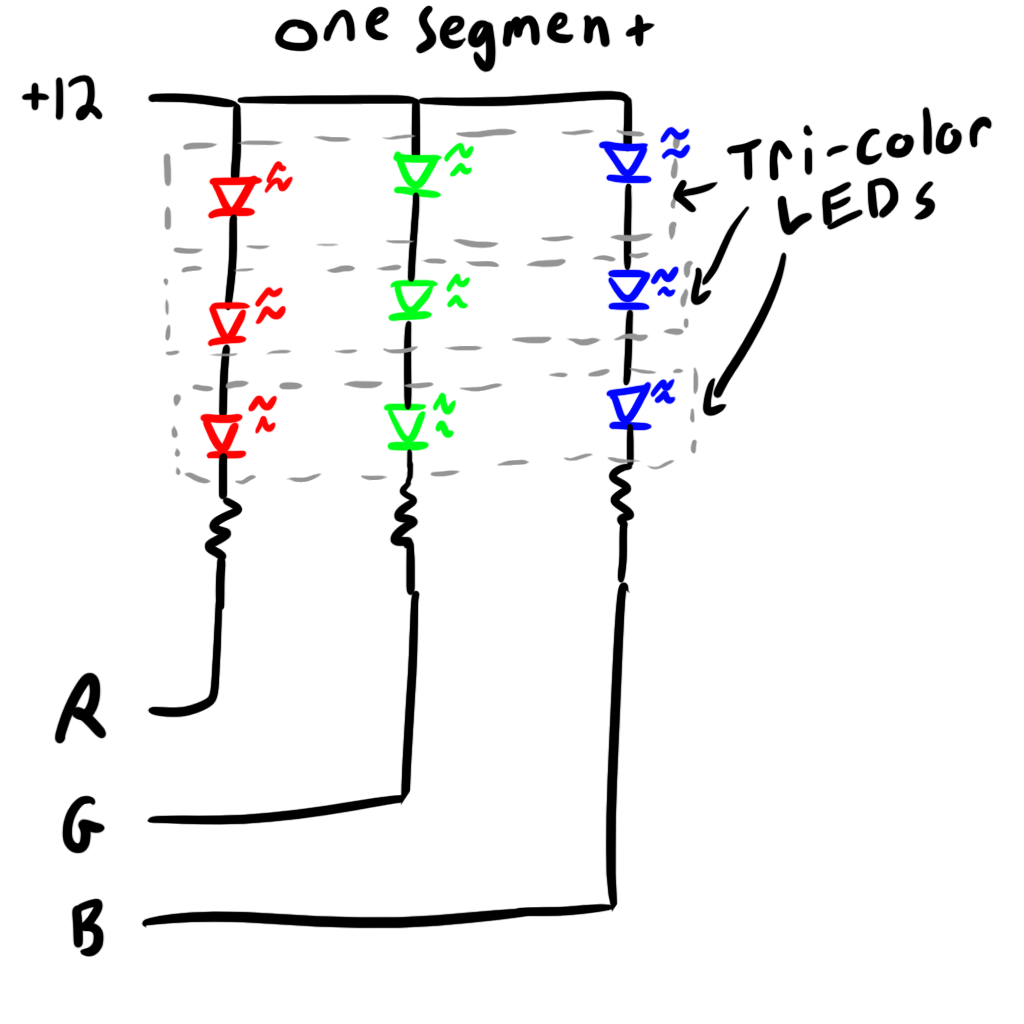
 The strip can be cut into segments along special perforations leaving 3 tricolor LEDs and 3 current limiting resistors together. The picture above is of one such segment. Here is a diagram of the segment:

The idea is that all of the the R, G, B, and +12 connectors are tied together so that all of the 3-LED segments are actually running in parallel. That means to power it, you just need a 12V power supply that is able to supply enough current.
The end of each strip has little copper contacts. You can buy strip connectors for clipping them together, but I found that I could simply solder straight to the copper piece without incident. Kapton tape can really take a beating temperature-wise:

So, I figured that the plan was to supply 12V to the “+12V” line and sink the current through the R, G, and B lines to turn on each LED respectively. This means that the LEDs are multiplexed though, so I would only be able to drive one LED color at a time. To mix colors, I would have to blink between them in sequence.
To sink this current, I figured that I would be using an N-channel FET. Curious about how “the other guys” did it, I opened up their little controller box and found this:

Those N-FETs are a little scary. They are 3055s, which according to a little internet search are rated for 20A at 60V. I measured the current through the LEDs, and even at full tilt, all three currents summed together never make it over 1.8A. A little over-engineered I guess. The FETs I used in my design were rated for 1.7A continuous which is fine considering that all three together barely break that limit.
Power
I was going to need around 12V to power this circuit. I really wanted to make it battery powered, but the current draw was going to be in the 1-2 Amp range, and at 12V, that would add up to a lot of D Cells. I decided to instead go with Li-Ion batteries.

I purchased a pack of 18650 battery cells with a charger off Amazon. These batteries are sort of like super-sized AA batteries and are each rated for 3000mAh at 3.7v (given the price, I’d be surprised if they make it over 2200mAh, but that’s still not bad).
Three of these in series will give me more than enough voltage for my LEDs. I found an awesome 18650 cell holder on Digikey that made this whole thing a cinch. The user just has to pop out the cells and charge them between uses. This is a lot easier than building my own charging circuit for an integrated battery cell. Being my first ever project with Li-ion cells, I thought I’d play it easy and go this route. The battery holder doesn’t connect the three cells together at all, so I had to do a little wiring of my own to put them in series:

I know that Li-ion cells can break if you over-discharge them (even if these claim to have integrated protection circuitry), so to use them, I was careful to include some sort of low-battery indicator/shutoff.
My Circuit

I decided to go digital with the LED control in this circuit because it would be too difficult to get the LED mixing right with all the different color options using analog circuits (plus, if the client changed his mind about something, it would be easier to alter some code than make major schematic changes). This also allowed me to add some neat features like the low-battery indicator light as well as two buttons: one changes the color and the other switches the mode of the lights (flash to music, stay on all the time, and stay off all the time).
There isn’t much to be said about my micro controller code. I used one of the onboard timers to handle the LED PWM. There’s a look up table for different color mixings at every brightness value (64 available). All the micro-controller has to do is pick a brightness value based on the ADC voltage and set the duty cycle of the LEDs to match the appropriate value on the lookup table.
The framework of the audio circuit was more or less copied from the glasses, but with some changes. Rather than using the half-rail biasing trick, I decided to include a charge-pump inverter (U5) that takes my +5 rail and gives me a -5 rail to power my op-amps so I could do a proper GND bias. This was important because I am reading my envelope into a micro-controller’s ADC which can only measure from 0 to 5V and I wanted to give it as much range as possible.
One thing I noticed that was very interesting was that in the glasses, R13 was a 50k resistor which puts the RC time constant of the envelope detector at .5 seconds. This means that it would take around 2 seconds or so for the envelope to die down after an impulse. This is way too slow. I’m not entirely certain why it worked so well in the glasses, but for this project, I changed it to 10K (.1s time constant).
I programmed the micro-controller using a little adapter cable that would connect the six pins of the programmer to six pins spread throughout my PCB. This was a lot easier than fighting to squeeze my programming header into the board.
The entire audio circuit is powered by a LM7805 which keeps my 5V rail constant. This keeps my audio waveforms from changing as the battery voltage changes. It also allows me to accurately measure the battery voltage as it dies down (that’s what the R9 and R8 divider is for).


I was really amazed with how clean my PCB came out. I was using a new piece of copper clad this time that I had just ordered, and I think it is a lot thinner than the old stuff. It etched a LOT faster (45 minutes as opposed to three hours), and there was very little pitting or undercutting.
I was also pretty excited about the connectors and mating plug I used. They make the final product look really clean.
Here is the final product with the battery holder:

This all fit really neatly in the jacket pocket.
The Jacket
The jacket turned out to be really easy to work with. There is a cloth liner to the leather exterior creating a gap that wires fit through easily. The plan was to have a single strip that runs up one side and down the other around the collar along with two strands around the sleeves.
The LED strips had an adhesive backing that stuck to the leather very well:

My lady friend helped me snake all the wires around and have them poke through holes in the seams. In the sleeve:

And out the collar:

What’s neat is that because the LEDs are all in parallel, it was easy to tap into a convenient point along the main strip to attach the wrist LED strips.
I might look a little stiff in the video below, but that’s only because I was trying to get the wrist LEDs to light up my hands as much as possible. The jacket is actually quite comfortable and flexible.
Battery Life:
I was curious to see how long the batteries would last (also so I could set up the low-battery indicator voltage), so I hooked a voltmeter up to the battery enclosure and let it discharge at full brightness for a while:

This thing started at 12.20V and isn’t even close to the 9V cut off after nearly three hours. Three hours is super long when you consider that it will actually be blinking during a performance and will probably use less than half the power I’m using here.
Conclusion
This is my first ever commissioned piece, and I had a lot of fun making the final product well polished and easy to use. I’ll be mailing it off tomorrow.
Here’s a BOM.
Update!
And here’s a photo of my client wearing it. I think it looks pretty swanky.

Project files can be found here: Light Up Leather Jacket v1.1
Nicely done! Hope you have time to continually work on projects like these.
Great projects and wonderful blog posting, but I think you should keep some of the technical stuff to yourself and use it in your arsenal of marketable skills. Someone will ‘rip off’ your projects and make a pile of money at some point. Nothing wrong with protecting your intellectual property. Cheers!
You’re missing the entire point of the blog! I hope that someone rips off my ideas! I already have a job and make enough to get by. My hope is to inspire others to learn what I’ve learned and empower them to make their own ideas into a reality.
A true master of his craft! As a technical person who loves technology, all I want is to see progress, growth and innovation. You’re a legend.
Man, I couldn’t imagine wearing that in a nightclub… those places get damn hot, the last thing you would need would be a leather jacket! 🙂
Still… looks freaking awesome and if the DJ is happy to sweat, then so be it 🙂
Sweet.
Nice work man !! What was your time frame on this? from request to completion…
Not to criticise but why you still etching your own boards? yes fast but there are really cheap fab houses out there.. plus you can brand your boards like a business cards, should anyone enjoy the work. I also noticed you use a lot of plastic enclosures… ever think about getting the MakerBot personal 3d printer for your own enclosures? thats on my wish list for next christmas should my wife ever allow me to get one.
Anyhow keep up the great projects !
Thanks for the comments!
I have actually considered getting a makerbot printer. I’ve actually got a hand mill which when combined with the enclosures off Digikey works out pretty well. I might get the printer to help with some of my more bizarre enclosure needs.
I’m actually at the point now where I can print a board in a number of *hours* for maybe $2 (with maybe a 90% yield) which for my smaller projects beats the pants off of even the cheapest fastest fab house. I had literally a week to design and build this jacket to make my deadline, so I would have paid out the nose at Advanced Circuits or whoever else.
hey if you get a chance to read this, contact me, i wanna talk buisness about getting one of those jackets and shades
Sorry, they are not for sale.
Pingback: A Look at the Early Days of Ch00ftech, And Why You Can’t Run LEDs in Parallel | ch00ftech Industries
I had a question that I wanted to ask, im making a jacket for a very big pop star, you can probably guess who it is, and I really wanted to know if you could help me out by also putting lights in the jacket that I have bought. It is a leather jacket, and the jacket will be given to her. This will be the second one.
If you can, please please pleasseeee contact me by email for more info.
I sent you an email. Let me know if you don’t get it.
Pingback: China is Awesome | ch00ftech Industries
Would be willing to make one for me I will pay for it? If so please let me know email direct at motivate2008@gmail.com
Pingback: Strongerer Glasses (with digital EL sequencer) | ch00ftech Industries
Pingback: QR Clock | ch00ftech Industries
Pingback: Sound Reactive EL Panel Dimmer (pretty much done) | ch00ftech Industries
Pingback: Making a Cooler Business Card | ch00ftech Industries
Pingback: Bucking It Up | ch00ftech Industries
Hi! Your projects are inspiring to say the least and I’d like to delve into similar projects on my own. Would you be willing to refer me to resources you used to learn how to sync LED strips with music? All help is appreciated!
Pingback: Bucking It Up » Geko Geek
Pingback: The Gutenberg Clock | ch00ftech Industries
So as I was looking for a led leather jacket to by I came across your site. I am amazed at what you did with this jacket and was wondering if you had the time we could discuss price in making one, also if it could have lights not only on the inside but on the outside as well.