Building the motor
Going into this project, I had no idea if it was going to work at all, so I quickly set to work proving the concept. The circuit schematic looked like this:
Providing power to the motor is a DRV8313 from TI. This chip presents three half-bridges which can connect three outputs to either VCC or GND. This is perfect for driving the three phases of my Wye configured motor. It also has an integrated 3.3V regulator which can provide just enough current to power the micro controller responsible for sending the proper sequence of pulses to the motor driver. It can even auto-shutdown when it detects an over-temperature or over-current event to prevent from blowing itself up.
Other features of my PCB include a UI button for development work and a potentiometer which I figured might be useful for tuning the drive frequency without having to reprogram the firmware, but I never ended up using it.
Power was to be provided by a bunch of batteries in series (more on that later), but I figured it’d be somewhere around 20-25V.
A quick print job and some reworks later and I had a PCB.
I rigged it up with some red-green LEDs in a wye configuration to test it out.
When driven in one direction, the “phase” lights up green and in the other direction it’s red.
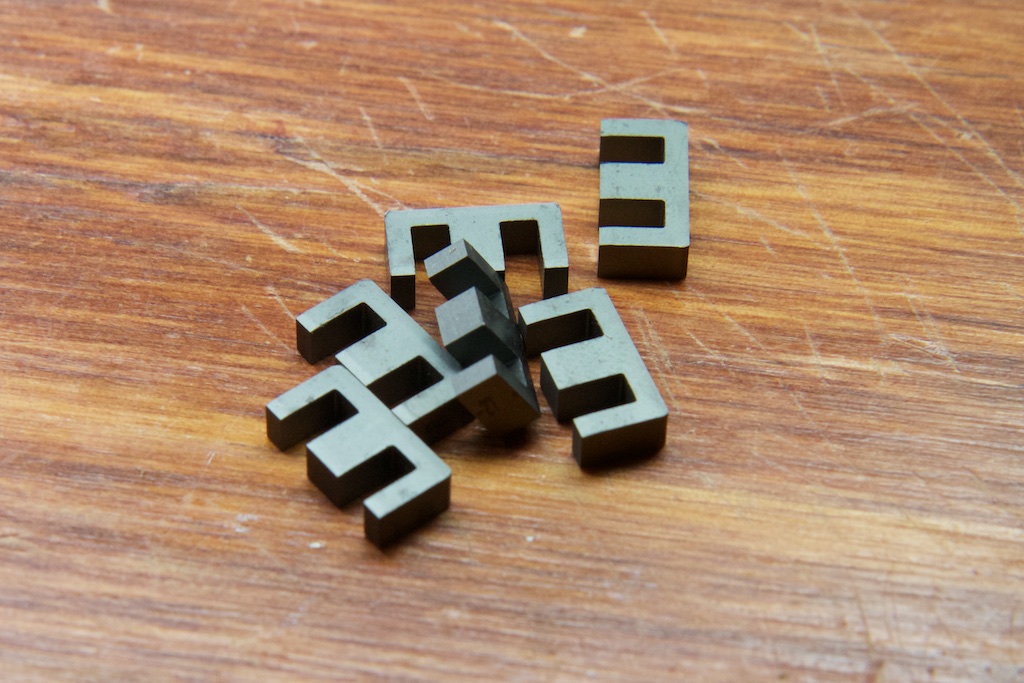
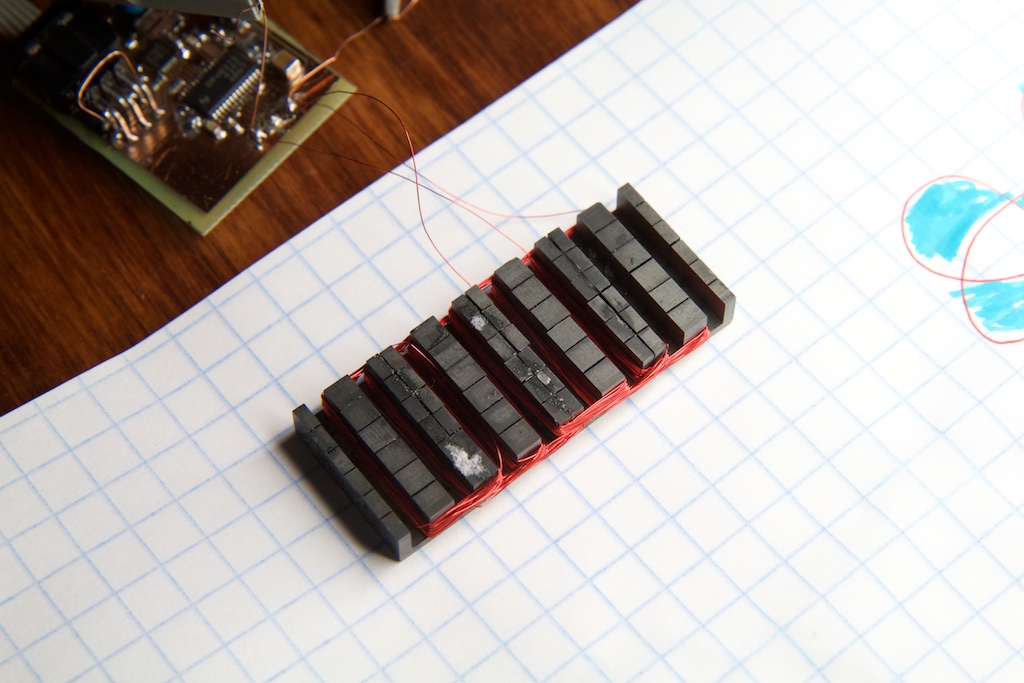
Now it was time to wind my motor. I started out with a bunch of ferrite E-cores. I’ll give you two guesses why they call them E-cores:
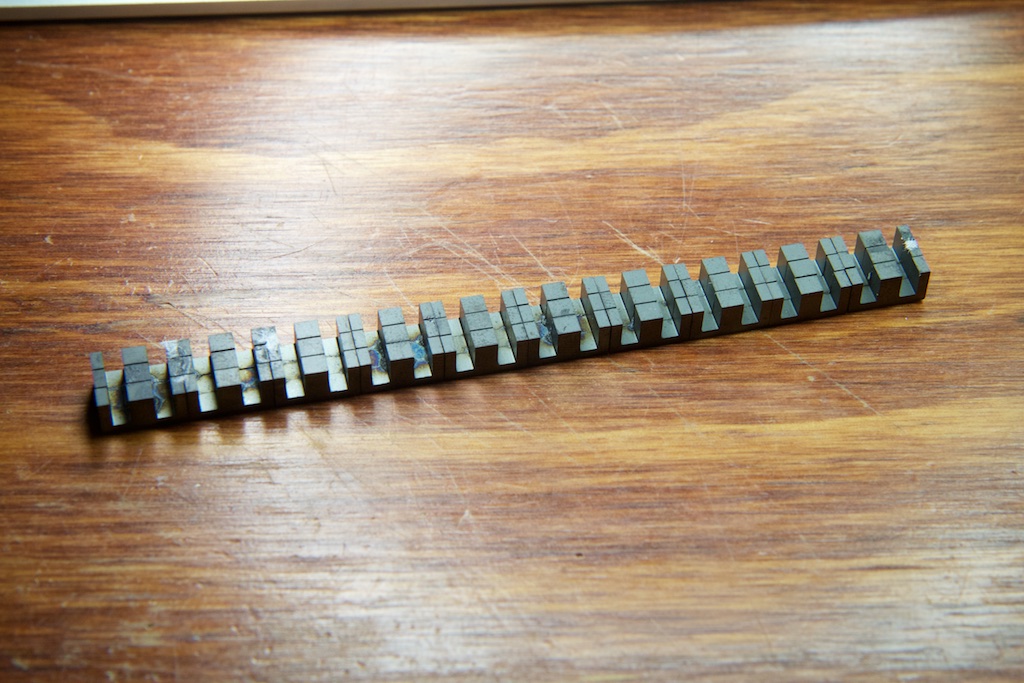
I started by gluing a bunch of cores together with superglue.
These fell apart pretty quickly (my glue is expired I think), so I settled for a smaller array with 50 or so turns of 36AWG magnet wire on each coil (100 on each phase):
For a quick test, I used a piece of a soda can as my rotor:
These are delicious by the way.
I increased the drive frequency of my circuit to a few kHz just to see what would happen and got this:
Hey, movement! Holy crap! It works!
Now, I wasn’t going to be blowing by any checkered flags with a barely moving piece of tinfoil, so it was now time to optimize the motor.
Optimizing the motor
Step one was to increase the area of my coils. Generally speaking, the larger the area of the stator/rotor interface, the more force it can apply. You can think of it as two different motors running in parallel. I doubled the width of the motor and did just 25 turns of the 36AWG wire. This worked out to 50 turns per phase (since I had two coils per phase).
At the time, my reasoning was that I didn’t want to overload the driver by running the motor coils too slowly. As frequency drops, inductors look more and more like wires, so I wanted some amount of series resistance to keep the current down. At about 0.097
![]()
per turn, 50 turns per phase and 2 phases per motor state (Wye configuration), I would draw a maximum of around 2-2.5A at 20VDC. This turned out to not be the best strategy as you’ll see later.
And here’s how it worked:
Progress!
I still wasn’t very satisfied though. With 9
![]()
across my motor driver, I was wasting a lot of energy in resistive losses. At this point, I tried to figure out how to optimize the number of turns vs, the wire thickness.
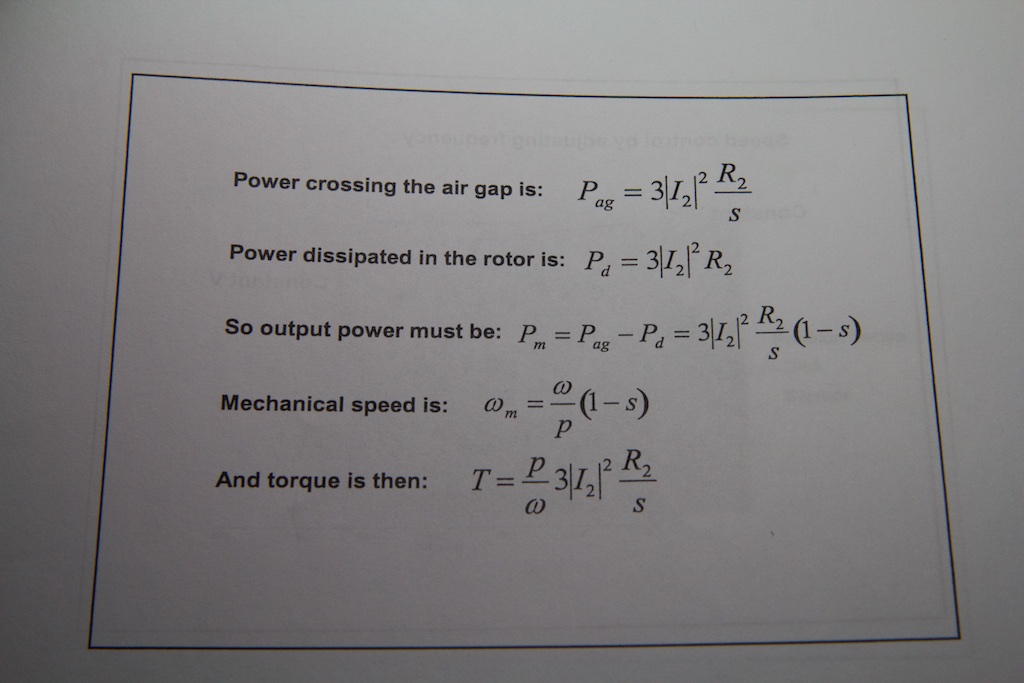
The math dictating the performance of an induction motor can get complicated pretty quickly:
What I discovered ultimately is that the efficiency of a motor is for the most part dictated by the physical geometry of its rotor and stator. Good magnetic coupling, good magnetic materials, and low resistance bearings can do a lot to improve motor efficiency, but the number of coils or thickness of wire really just change the torque/current and voltage/top speed properties of the motor. As long as the cross sectional area of the wire coil is the same, the motor efficiency is more or less identical. More turns gives you more magnetic field per ampere, but it also gives you more resistance at the same rate which decreases your current.
The only exception to this has to do with wire insulation. Assuming all magnet wire has an enamel coating of the same thickness, a smaller diameter wire will have a larger proportion of its cross sectional area taken up by insulation which contributes nothing to motor performance.
With this in mind, I re-wound my core using just 8 turns of 24AWG wire. This would provide a minimal resistance to my motor driver:
What I immediately found was that this motor would trip the over-current protection circuit of my driver almost immediately. I had to drop the driving voltage from 20V down to 10 just to get it to run at all. The results were more or less the same as before:
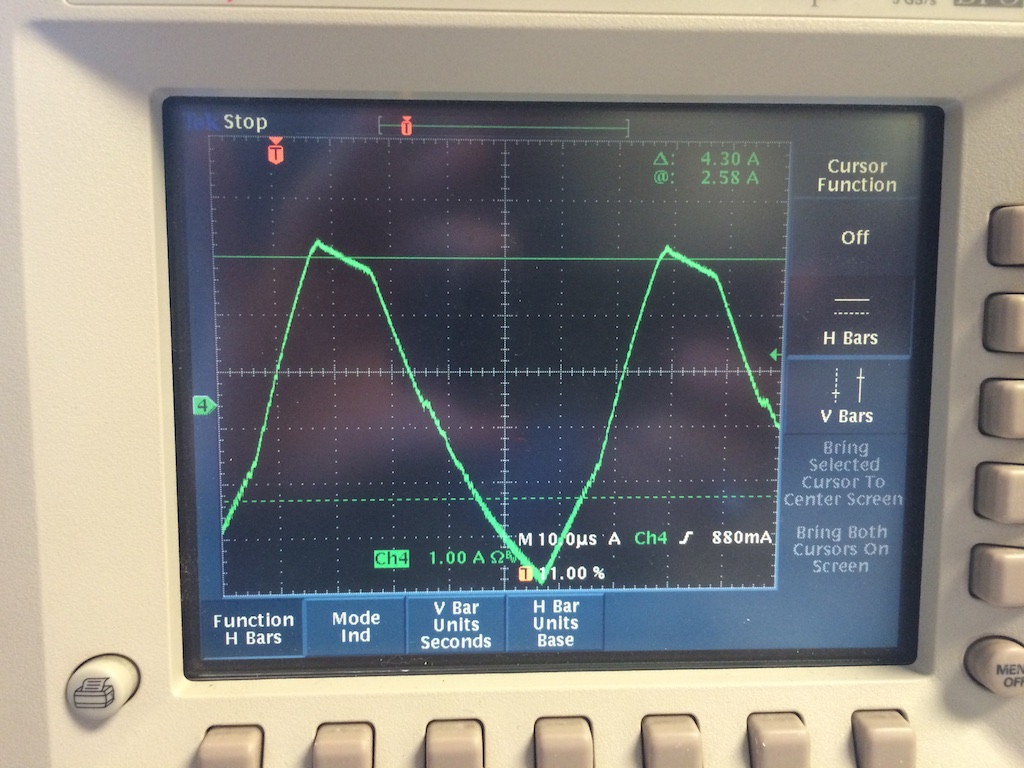
Looking at a current trace taken from on one of the phases, it’s no surprise that I was tripping the over-current detector:
The peak current was bumping up against 2.5A in either direction! What’s more is how fast it was changing. I’m assuming that some of the non-linearities of the motor current are due to overloading the motor driver, but you can still see the current change by about 5A in just 20
![]()
s.
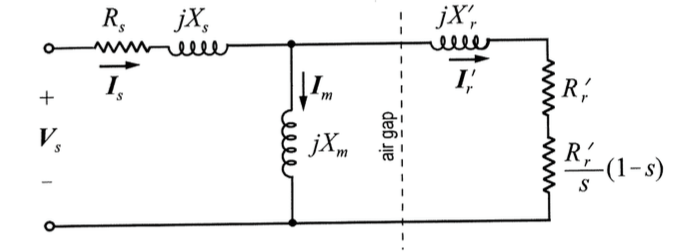
This makes a lot of sense if you look at a circuit equivalent model of an induction motor. I found a good one in a white paper on the subject.
In this model, the goal is to get as much current as possible to the
![]()
equivalent resistor. This is the power that will actually make it to the motor. In my case, here’s how it stacks up.
-
![Rendered by QuickLaTeX.com \[R_s\]](https://ch00ftech.com/wp-content/ql-cache/quicklatex.com-5eed91e4bce7123670dfd139af1bda38_l3.png)
represents the resistance in my primary coil (which is now minimized due to the thicker wire/fewer turns).
-
![Rendered by QuickLaTeX.com \[jX_m\]](https://ch00ftech.com/wp-content/ql-cache/quicklatex.com-e71c3d39fffd0428735569822ee6819f_l3.png)
encompasses the losses of my magnetic core material. Ideally, this would be minimized, but I can’t really do much about it.
-
![Rendered by QuickLaTeX.com \[jX_s\]](https://ch00ftech.com/wp-content/ql-cache/quicklatex.com-399927b4332c167219633839b2e17a27_l3.png)
represents leakage inductance in my primary coil. Some amount of magnetic fields generated in my stator won’t make it to my rotor. The more fields that do this, the larger this leakage inductance. Ideally, it would be minimized.
-
![Rendered by QuickLaTeX.com \[jX'_r\]](https://ch00ftech.com/wp-content/ql-cache/quicklatex.com-2faa4fa1053394bd66d8e2211d258879_l3.png)
and
![Rendered by QuickLaTeX.com \[R'_r\]](https://ch00ftech.com/wp-content/ql-cache/quicklatex.com-073fdeeca0589fda1d1e7d1f43ef6fb2_l3.png)
are the rotor-side counterparts to the values on the stator-side.
So the big problem here is that my leakage inductance must be huge. Considering the air-gap between my stator and rotor and the non-optimal design of my rotor (sheet of metal), a huge amount of the magnetic fields aren’t even making it to the rotor. This was made even more obvious by the fact that removing the aluminum plate during testing only decreased current draw by a small mount. A lot of the power was being wasted in the primary by its leakage inductance and resistance (in this case, the motor driver had more resistance than the coil, so the driver heated up rapidly).
So if I was designing a motor properly, I would change the geometry of the system to maximize the inductive coupling between the rotor and stator and minimize this leakage inductance. I couldn’t really do anything about that though. Especially considering I had about two weeks to get this whole thing working.
The next thing I could try is reducing system current by increasing switching frequency. By switching through phases of my motor faster, I can actually use the leakage inductance to reduce the peak current draw. Because inductors have higher impedance at higher frequency, this should reduce my peak current and therefore reduce the amount of power wasted in my resistive losses.
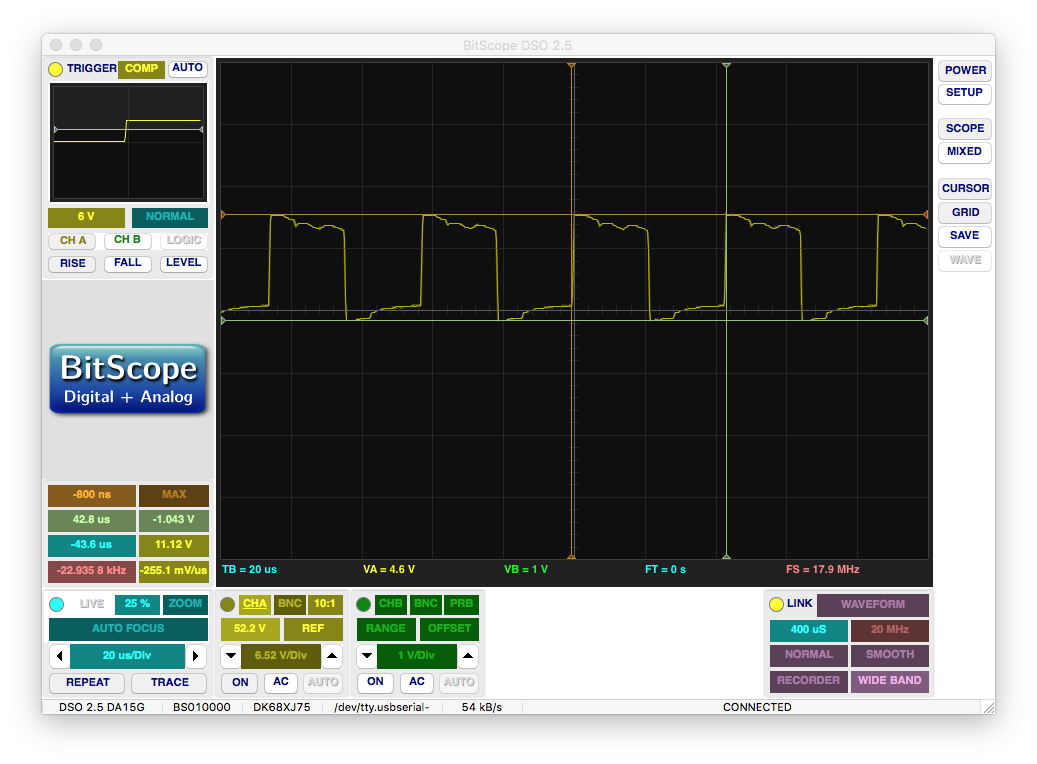
My firmware was running on an ATTiny24 and was basically just an infinite loop with a hardware timer interrupt set to update the motor driver every time it expired. Unfortunately, I got to a point where the time-out was shorter than the time it takes to jump to the interrupt and run the code there. At this maximum speed, this is what one of my phases looked like:
Even at 22kHz, I couldn’t operate the motor at 20V. I spent an hour trying to make the code faster (changing complier optimization settings, using a Switch statement instead of a lookup table in an array), but ultimately couldn’t make much of an improvement, so I gave up.
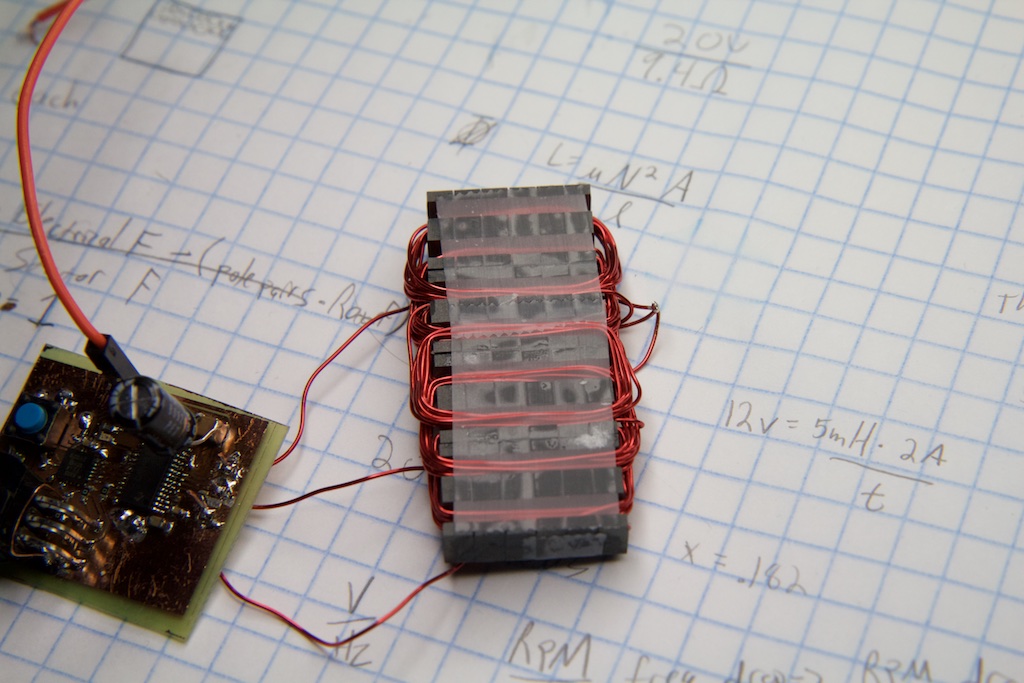
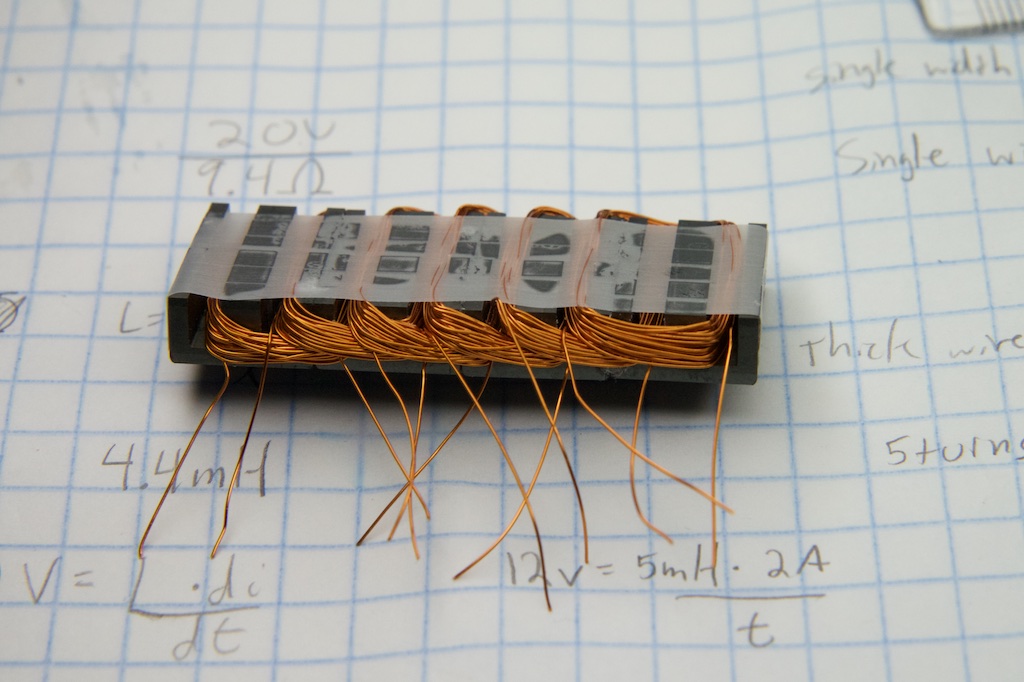
The next step was to re-wind the motor yet again this time with a compromise between the two previous designs. I settled on 25 turns of 30AWG wire.
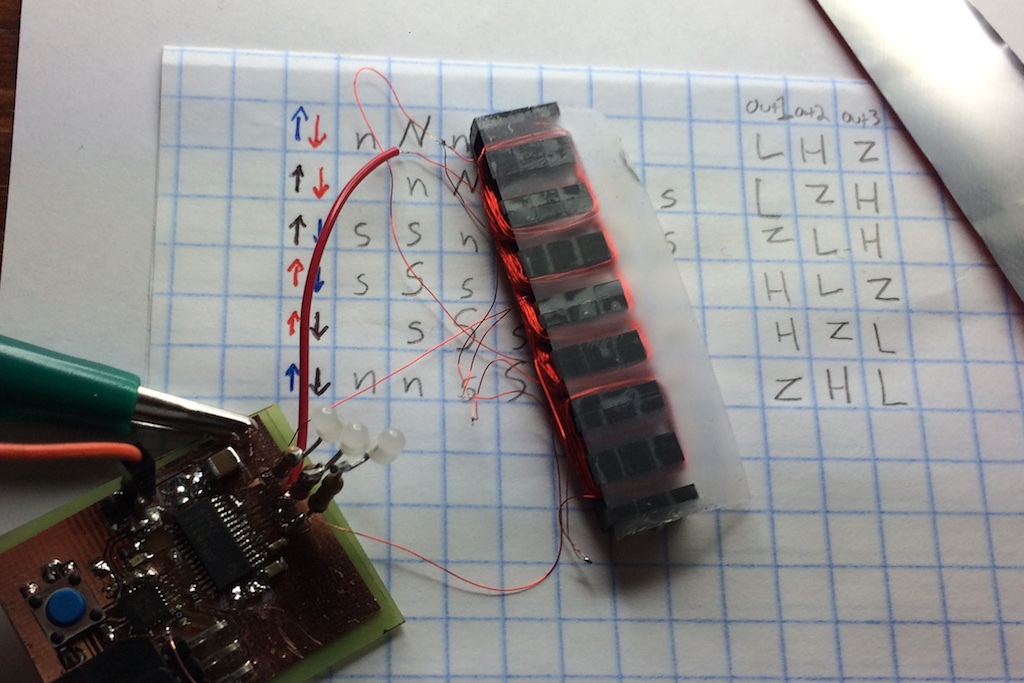
This one was a royal pain in the butt to wind, but I eventually got everything to fit in there. Normally, when hand-winding inductors, the core manufacturer will provide a plastic “bobbin” that can be easily wound and slipped over the center of the core. There was no such bobbin for my Franken-core, so I had to make do with some tape to hold everything together.
After connecting all eight cores in a Wye configuration, I connected my motor to the driver circuit and gave it a shot.
With my firmware still configured to drive at such a high frequency, the increased inductance of the stator prevented any appreciable amount of current from flowing into the rotor. Remember that inductance goes as number of turns squared while magnetic field goes linearly with ampere-turns. Increasing the number of turns slows down the current ramp faster than it increases the magnetic field due to each ampere.
Decreasing from 22kHz to somewhere around 5kHz, I got this:
Now we’re cooking with gas an induction stovetop!
There were probably a few more things I could have done to improve the motor performance even more, but it was the week of the competition, and I still had so much more to do.
Front-facing sensor and autopilot firmware
Even with the lower-current performance of the new motor, it still drew way too much power to leave on all the time, so I needed to design some way for the pinewood derby car to switch itself on for each race.
I came up with a simple infra-red reflection sensor solution. I neglected to leave a pin of the micro controller free for this feature, so I used PA4 which was already brought out to the 6 pin programming header. Using the internal pull-up resistor of the GPIO, I configured the IR phototransistor to pull it down in the presence of infrared light. 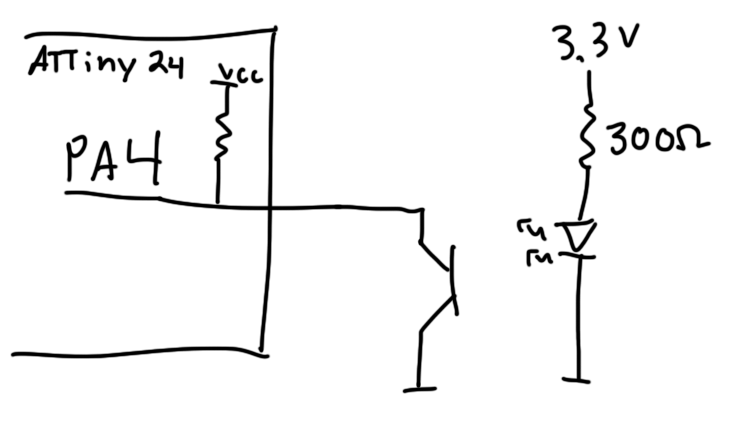
I then configured the firmware to “arm” the car when the IR sensor detected the presence of the starting gate for five or so consecutive seconds. After that point, as soon as that IR reflection went away, it waited an additional 250ms before firing the motor for five seconds.
The 250ms delay (not shown in the below video) was a precaution due to the fact that the starting block holding the cars back is made of steel. Some enterprising engineers in the past have attached magnets to the front of their cars so that the falling gate will pull their car forward and give them a boost. I was afraid that my motor would be attracted to the ferromagnetic steel gate as it rolled over it which would act to slow down the car.
Table of contents
- Motivation and induction motors
- Building and Optimizing the motor
- Building the car
- Results and conclusion



I’m curious as to whether your firmware could’ve been improved further by refactoring the interrupt. Because interrupts must not change the state of the chip, the routine begins by pushing every register it uses onto the stack, and ends by popping them back off. The compiler is pretty bad at reducing number of registers used, so complex interrupts may have an overhead of about 30 cycles(15 registers, pushed and popped), about 2us at 16MHz, per interrupt.
This could be improved by reducing the complexity of the ISR, programming it in assembly, or by abandoning the interrupt and refactoring the timing-critical code into the main loop.
I’m not sure what your code looked like at this point, or what kind of timing requirements you had to meet at your fastest frequency, but I imagine that it could be possible.
Oh yeah, I’m sure I could have done a lot to make it faster. I’ll upload the code and design files tonight if you’re interested. I’ve only done assembly on the 8051, and I didn’t have enough time in this project to figure all of that out for the AVR, so I opted for more coils/slower frequency. Based on the measurements I took, I’d need to get my switching down to something like 5us per interrupt if I wanted to make it work with the smaller coils.
Neat project!
Your best bet on AVR is to just unroll the switching (you only have 6 steps — explicit code is way smaller than accessing data) and don’t even bother with interrupts. You can use a timer to set the overflow flag or similar, but you can just spin on that flag and clear it from software (write back the value you read) rather than even bothering with jumping to the vector, setitng up the stack, etc.
That being said, I do software PWM very similar to yours at much higher speeds with interrupts, but written in assembly, and with some tricky tricks like using “ijmp” as the interrupt vector. Doing that from C would be particularly fun. Last I experimented with naked interrupts on AVR, GCC would like to emit random moves to unused registers at times, making it very difficult to manage your own stack unless you just inline-assembly the whole thing. You can, however, reserve registers for this purpose, which is nice.
Nice job. I enjoyed reading it. You should test the motor again with the aluminum piece but use a piece of wood or plastic to give you a bigger gap between the motor and aluminum. Then you can see how much the bigger gap affected things.
Great job, and I’ll bet the winning car didn’t pass emissions!
>The strange thing is that it only ever used 17% of the processor and if I started another instance at the same time, it would take another 17%.
100/6 = 16.6667
It was a single threaded task, so it could only use one core.
Pingback: Bookmarks for October 13th | Chris's Digital Detritus
Pingback: TECNOLOGÍA » Lorentz forces and cheating at the Pinewood Derby
It kills me that you have to drop your voltage from 20V to 10V! Use a hardware timer (if available) to generate a 100 kHz PWM (if you can) to wave-shape the current and you wont need to! Your ultra-small inductance is working against you here.
DRV8313 is my favorite motor driver.
–Matt
I’m actually already using the hardware timer, but it’s a pretty complicated waveform to generate entirely with hardware timers (three phases and all that), so I ended up just increasing the number of turns.
Pingback: Ultrasonic parking sensor | ch00ftech Industries
Pingback: Lorentz forces and losing the Pinewood Derby | ch00ftech Industries
Pingback: Animated EVSE | ch00ftech Industries
Good web site you’ve got here.. It’s hard to find good quality writing like yours these days.
I seriously appreciate people like you! Take care!!
3kjxweq
ivaryym7
yrczp8
yilesk
quruwh
Pingback: Ultrasonic parking sensor • Tech Projects
urb286
6b6v8x
hxe38a
1l495x
927srv
6t01yl
piylf4
rx623i
utr10r
6z0cp4
35yo94
4odza9
jmiotr
26hc70
fcxs8w